If you want the highest payoff from home insulation in Iowa, start by stopping air leaks, then bring your attic/walls/floors up to sensible R-values for your climate. Done in the right order, insulation and air sealing can cut wasted heating/cooling and improve comfort, often more than people expect.
Most “insulation advice” online skips the part homeowners actually need: what to do first, what to avoid, and what changes the scope and timeline. In Des Moines, Iowa, you’re dealing with long heating season swings, summer humidity, and a lot of homes where the attic and rim joists quietly leak air.
Here’s the 2026 installation guide you need to know before spending money.
What’s The Smartest For Home Insulation In 2026?
Decision rule: If you’re uncomfortable (drafts, hot/cold rooms) and your attic is accessible, start there.
Common mistake: Buying more insulation before checking for air bypasses. You can pile on R-value, but if warm air is leaking into the attic through gaps, performance still suffers.
Quick homeowner check (10 minutes):
- Look for attic “bald spots” where insulation is pushed aside around electrical boxes or plumbing.
- Check the attic hatch; if it’s unsealed or uninsulated, it’s a big leak.
- Find one can light or bath fan housing. If you can feel air movement, you need air sealing first.
This “seal first, then insulate” sequence is exactly what ENERGY STAR’s Seal & Insulate guidance is built around.
Do You Need Air Sealing Before Insulation?
Usually, yes. At least in the attic plane and rim joists.
Local factor: In older Des Moines-area housing, the leakiest spots are often attic top plates, plumbing stacks, chimney/vent chases, and the rim joist (especially over a cold basement or a vented crawl).
If X then Y:
- If you have ice dams or attic frost patterns in winter, air sealing is urgent before adding insulation.
- If you smell mustiness when the furnace runs, check return-side leaks and rim joist leakage paths (air sealing + targeted insulation).
Reality check: Air sealing is often the “small line item” that determines whether the insulation upgrade feels worth it.
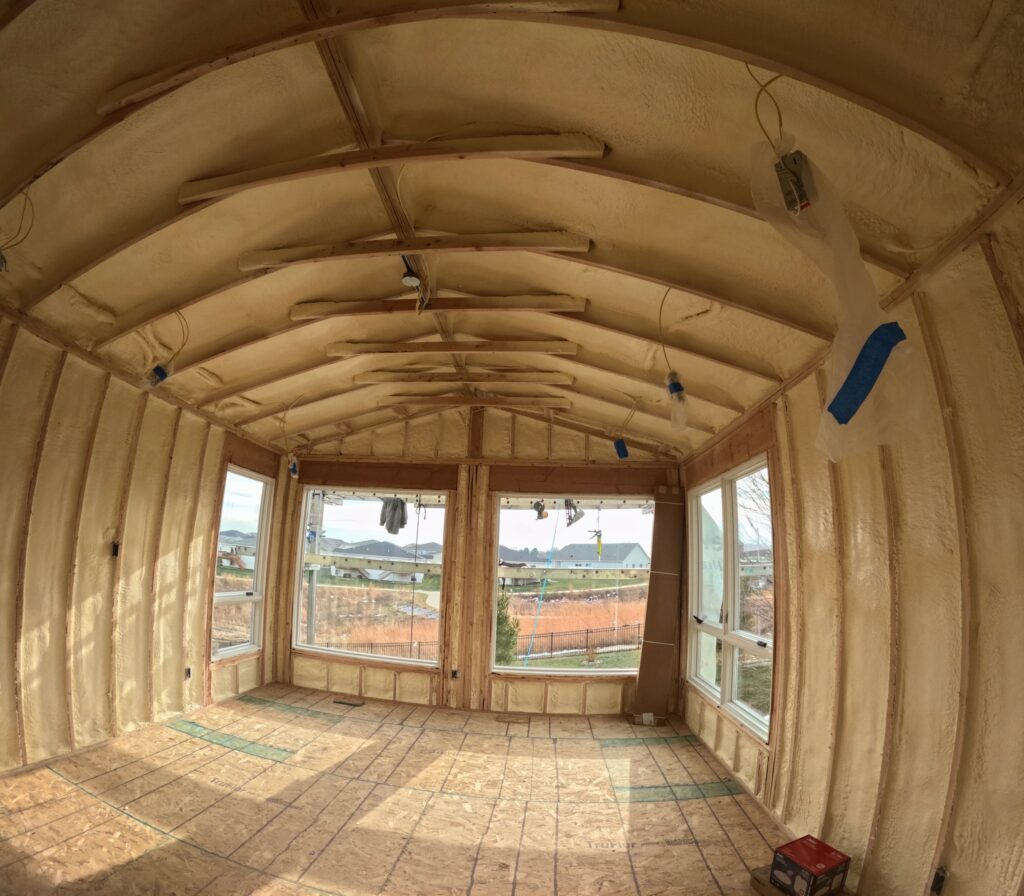
Which Insulation Type Should You Choose (Spray Foam Vs Fiberglass Vs Blown-In)?
There isn’t one “best.” The right choice depends on access, moisture risk, and what you’re trying to fix.
Common mistake: Choosing a material first, instead of choosing the problem you’re solving.
Practical decision rules:
- If drafts are the main complaint (air movement), spray foam in targeted areas (rim joists, attic bypasses, certain wall/ceiling transitions) can be high-impact because it also air-seals.
- If you need straightforward coverage at a reasonable scope, fiberglass batts (walls) or blown-in insulation (attic) can be a solid path, especially when paired with attic air sealing.
- If you’re renovating and walls are open, that’s the moment to do it right. The air seal penetrates and insulates cavities before drywall.
Spray foam safety note (keep it factual): Interior spray polyurethane foam requires proper ventilation, isolation of the work area, and appropriate protective equipment during application; occupant re-entry timing should follow manufacturer guidance.
How Much Insulation Do You Need (R-Values For Iowa Climate Zones)?
Most of Iowa falls in IECC climate zones 5 and 6, and ENERGY STAR publishes cost-effective retrofit targets by zone and location in the home.
Quick rule-of-thumb for Des Moines-area homes: Attic upgrades are often the biggest comfort win because that’s where the largest temperature difference and air leakage stack up.
Simple target table (retrofit guidance)
Location in the home | Zone 5–6 guidance (ENERGY STAR retrofit targets) | “Proof-of-human” tip |
Attic (uninsulated) | Add up to R60 | If you only see 3–4″ of insulation, you’re usually far short of today’s targets |
Attic (already has 3–4″) | Add to reach ~R49 | Don’t cover soffit ventilation, use baffles/vent chutes |
Floor over unconditioned space | Up to R30 (Zone 5–6 band) | |
Basement/crawl wall | Add R15 sheathing or R19 batt (Zones 5–8) |
(These are retrofit guidelines; new construction and specific assemblies may vary, always confirm local requirements and site conditions.)
What Drives “Cost” And Timeline For Insulation Installation In 2026?
Insulation cost is mostly driven by access and prep, then material. The U.S. Department of Energy notes insulation costs vary widely by R-value and material and recommends checking local suppliers/contractors for actual project pricing.
The real cost/timeline drivers:
- Access: Tight attics, finished ceilings, low crawl spaces
- Prep: Air sealing details, baffles, hatch build-out
- Removal: Rodent contamination, wet/matted insulation, heavy debris
- Scope creep: You start “attic only,” then discover knee walls or duct chases
- Verification: Airflow/comfort checks, photos, and walkthroughs (time well spent)
Local factor: Scheduling around extreme attic temps matters. Summer attic work can slow for safety, and winter can expose moisture/ventilation problems that should be corrected before burying them.
When Should Old Insulation Be Removed First?
- If insulation is wet, moldy, or smells like animals, remove it before adding new insulation.
- If attic insulation is packed down and dusty and you’re sealing major bypasses, removal (or at least pull-back and reset) often makes the air sealing actually possible.
Common mistake: Blowing new insulation over a problem layer. That can hide roof leaks, trap odors, and make future repairs harder.
What Does A Professional Installation Look Like Step-By-Step?
Here’s the sequence when the goal is comfort + performance (not just “more fluff”):
1. Assessment
Identify the leakiest zones (attic plane, rim joist, chaseways) and the rooms that don’t match the thermostat.
2. Air sealing
Seal top plates, penetrations, attic hatch, and other bypasses first (this is where most DIY jobs fall short)
3. Insulation install
Choose the right material for the assembly (spray foam for targeted air-seal + insulate areas; fiberglass/blown-in where coverage and depth matter)
4. Detailing
Protect ventilation paths, insulate the hatch, correct compression, and voids.
5. Verification
Photo walk-through, depth markers in the attic, and comfort checks in problem rooms
Conclusion
If you want home insulation in Iowa to feel worth it in 2026, don’t start with materials. Start with the sequence: Air sealing. Correct R-values. Verification. That’s how you turn “I hope this helps” into “the house finally feels even.”
If you’re comparing Home Insulation Contractors in Des Moines, Iowa, ask two questions: “What will you air seal first?” and “How will you verify coverage and depth?” The answers tell you a lot.
FAQs
1) Is spray foam worth it in Iowa?
It can be, especially for rim joists, tricky leakage paths, and areas where air movement is the real issue. It’s not automatically the right choice for every attic or wall.
2) What’s the biggest insulation mistake homeowners make?
Skipping air sealing and focusing only on R-value. ENERGY STAR’s resources repeatedly pair sealing + insulating because they work together.
3) Do I need an energy audit first?
Not always, but it helps when comfort problems are weird (one room off by 5–10°F). At minimum, do the quick attic checks and identify the worst rooms before you call anyone.
4) Can insulation really save energy?
Yes. DOE notes you can save up to ~20% on heating/cooling costs by adding insulation and reducing unwanted air leaks (results vary by home and scope).
5) Are there rebates in 2026?
Often, yes. But they’re program-specific. MidAmerican Energy’s rebate/discount pages include 2026 deadlines and submission timing; always verify current eligibility.
6) Do I always need insulation removal?
No. If the existing insulation is clean, dry, and just low-depth, you can often air seal (by pulling it back) and then add more. Removal is most common when contamination or moisture is present.